Loading stimuli
bitmaps
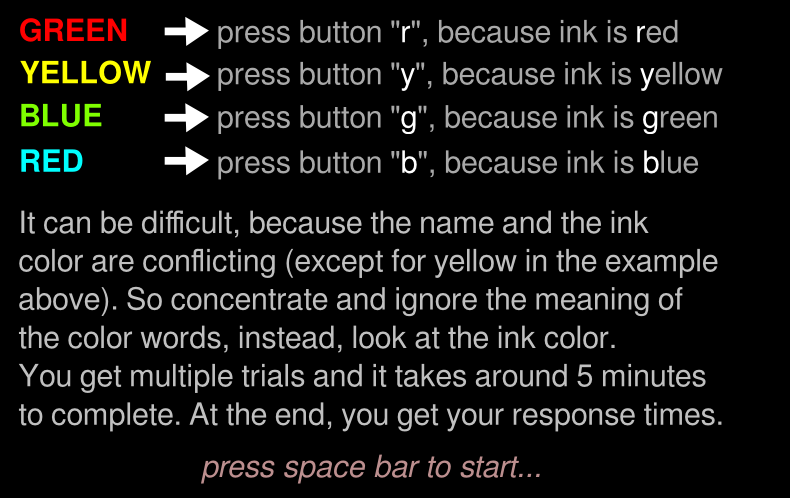
instruction1
instruction2
correct
mistake
fixpoint
yellowyellow
yellowgreen
yellowblue
yellowred
redyellow
redgreen
redblue
redred
greenyellow
greengreen
greenblue
greenred
blueyellow
bluegreen
blueblue
bluered
|
|
In the bitmaps section, each line contains the name of a bitmap
that you will be able to refer to in the rest of the code. If you use
png files, the computer will automatically assume that there is a
corresponding png file. You can use a second argument on each line to
specify the exact file, or a file in a different bitmap format, such
as jpg, bmp, gif.
|
Describing the conditions
table stroop
  "yellow yellow" yellowyellow 4
  "yellow green " yellowgreen  2
  etc
|
|
The table is the most convenient way to specify the parameters
of each experimental condition. For each condition, you have one table
row. In the later code, you can refer to a column with the @ sign (see
below). In the current example, there are 3 columns. The first colum
specifies a human readable text which is just for humans, the computer
further does not interpret this, but can add it to the output data
file (see the save line below).
|
|
|
A task describes (typically) all events of one trial. In the
Stroop experiment, there will be 40 trials. That means, the computer
will "call" this "task" 40 times, and each time, it will randomly
select one of the rows of the table (there are different ways of
selecting table rows, but this is the default).
|
Telling computer which table is being used
|
|
In the task, you need to specify which table is being used, even
if there is only one table. You can have multiple tables if you have
multiple tasks. But you can maximally use one table in one task, and
which one is being used is entirely fixed.
|
Telling computer which keys are used and how they are numbered (1,2,3,4)
|
|
You need to tell the computer which keys are being used for
response measurement (unless you do not have normal keyboard input,
which can happen in certain experiments).
|
Telling computer to do nothing for half a second (500 ms)
|
|
Waiting for the next even. Time specified in milliseconds. Of
course.
|
Telling computer to show fixation point at the center of screen
show bitmap fixpoint # stimulus 1
|
|
Show the bitmap fixpoint. Everything about the # sign is
comment. If no X,Y position is specified, the bitmap will be shown in
the middle of the screen (but see the option "origin" if you want to
change this).
|
Telling computer to do nothing for 200 ms
Remove the fixpoint (stimulus number 1)
clear 1 # remove fixpoint
|
|
The clear statement removes the stimulus from the screen. The
number corresponds to the order of the stimuli within a task. Thus,
the 1 corresponds to the stimulus that was being shown as the
first. Here, you could instead have used "-1", which removes the last
shown bitmap.
|
Show bitmap, the 2nd row of current row, at screen center
show bitmap @2 # stimulus 2
|
|
Now show a bitmap, but which one depends on the table row. It
takes the second column of the table, and the table row is chosen
randomly each time the task is being called. That makes that a
different bitmap will be shown each trial (unless you have a trial
repeat, of course).
|
Waiting for a button press
|
|
This tells the computer to wait for a key press. It expects that
the correct key is the one specified in the third column of the
current table row, and it will maximally wait 2 seconds for a key
press. If no key had been pressed within 2 seconds, the computer will
just go on and put the STATUS to TIMEOUT. If the correct key has
been pressed withing 2 seconds, the STATUS will be set to CORRECT
(which has value 1). If the incorrect key has been pressed, the STATUS
will be set to WRONG (or 2). The TIMEOUT status is equal to value 3.
|
|
|
The readkey sets the STATUS variable. There are three values,
which can be written as CORRECT, WRONG, and TIMEOUT, or as the
shortcuts, 1, 2, 3.
|
Erasing stimulus from screen
clear 2 # remove stimulus 2
Showing something only if response was correct and timely
  if STATUS == CORRECT
    show bitmap correct # stimulus 3 (feedback)
  fi
Showing something only if error made
  if STATUS != CORRECT  # stimulus 3 (feedback)
    show bitmap mistake
  fi
Erasing stimulus from screen
clear 3 # remove feedback stimulus
|
|
This keeps the values you want in the output data file. Only
this information is kept. You need to tell the computer what is being
kept for later analysis.
|
Show some instructions and wait for key each time
message instruction1

message instruction2
|
|
The message instruction just shows the bitmap and waits for a
key press. This is perfect for intro screens.
|
Do a block of 40 trials, call it the "training" block
block training
  tasklist
    stroop 40  # run the stroop task 40 trials.
  end
The block instruction is needed to have psytoolkit do
something. Just specifying a task is not enough. The task merely
describes what happens in a trial, but the block and tasklist
statements tell the computer to actually do it. In this case, the
stroop task will be done 40 times. The default way of working is that
each time, one of its table rows will be chosen randomly. There are
different ways (e.g., you can have a fixed order, or one in which each
trial is only done once before any other row is being chosen).